Embebiendo el webphone a su página web
Si su página web esta hosteada en el CMS Wordpress vaya directamente a esta sección: WordPress plugin
Incluyendo el código JavaScript del webphone a su index.html
Copie todos los archivos .js dentro de la carpeta /static/js a su web server. Puede observar un template del archivo index.html en demo/templates/index.html para saber que debe modificar en su página si quiere agregar el WebPhone. De todas maneras vamos a describir que hacer:
Incluir todos los archivos .js en el html de su página, como se ve en el index.html del demo.
Important
Mantener el orden de los archivos .js como se muestra a continuación.
{
  <script type="text/javascript" src="js/jquery-3.3.1.slim.min.js"></script>
  <script type="text/javascript" src="js/state-machine-min" ></script>
  <script type="text/javascript" src="js/jssip.js" ></script>
  <script type="text/javascript" src="js/mustache-3.0.2.min.js" ></script>
  <script type="text/javascript" src="js/phoneJsTemplate.js" ></script>
  <script type="text/javascript" src="js/phoneJsFSM.js" ></script>
  <script type="text/javascript" src="js/phoneJsView.js" ></script>
  <script type="text/javascript" src="js/miniPhoneJs.js"></script>
  <script type="text/javascript" src="js/phoneJsController.js"></script>
  <script type="text/javascript" src="js/jitsi_external_api.js"></script>
}
Incluir el siguiente bloque <script></script>, donde se encuentra el contexto del módulo JavaScript. A continuación, está la explicación de las variables:
{
  <script type="text/javascript">
   var phone_controller = undefined;
   var miniPhoneConfig = {
     'sip_user': "<<sip_user>>",    // The sip User obtained from the POST request to the API
     'sip_password': "<<sip_password>>",    // The sip Password obtained from the POST request to the API
     'KamailioHost': "X.X.X.X",     // The LAN IP of your OMniLeads instance
     'WebSocketPort': "443",    // The Port you use to connect in web URL
     'WebSocketHost': "OML_HOST",    // The DNS you use to conect in web URL
     'container_id': 'webphone-container',  // The ID of the <div> containing all the webphone
     'container_class': 'webphone-body',    // The class of the <div> containing all the webphone
     'webphone_keys_id': 'webphone_keys',   // The ID of the <div> containing all the webphone buttons
     'phone_key_pad_id': 'phone_key_pad',   // The ID of the <div> containing the numpad
     'phone_actions_id': 'phone_actions',   // The ID of the <div> containing the buttons for make the calls
     'non_phone_actions_id': 'non_phone_actions', // The ID of the DIV containing the non calls buttons (show numpad and end call)
     'footer_img_id': 'footer_img_id',  // The ID of the DIV containing the footer (FTS logo)
     'video_container_id': 'video_container_id', // The ID of the div used for displaying the Video Call
     'reload_video_id': 'reload_video_id',       // The ID of the reload video <button>
     'images': {
       'video_green': '/path/to/img', // The path to the video_green image
       'phone_green': '/path/to/img', // The path to the phone_green image
       'phone_red': '/path/to/img',  // The path to the phone_red image
       'powered_by': '/path/to/img',  // The path to the powered_by image
       'numpad': '/path/to/img',  // The path to the numpad image
       'reload_video': '/path/to/img', // The path to the reload_video image
     }
     'buttons_class': 'key_pad_button',   // The class of the <div> containting the buttons of the numpad
     'show_keypad_button_id': 'show_key_pad', // The ID of the <div> containing the button "Toggle Keypad"
     'destinations': [                        // These are the buttons that are going to launch the calls, you must to configure the number to call in 'phone', and the 'name' to be displayed
       {'phone': '01155001121', 'name': 'Sales', 'index': '0'},
       {'phone': '01177660011', 'name': 'Help Desk', 'index': '1'},
       {'phone': '01177660012', 'name': 'Suggestions', 'index': '2'},
     ],
     'video_channels': [                      // These are the buttons that are going to launch video calls, you must to configure the number to call in 'phone', and the 'name' to be displayed
       {'phone': '01155001121', 'name': 'Video Sales', 'index': '0'},
       {'phone': '01177660011', 'name': 'Video Help Desk', 'index': '1'},
       {'phone': '01177660012', 'name': 'Video Suggestions', 'index': '2'},
     ],
     'extra_headers': [                       // SIP headers you want to add to the INVITE of call
       'OML-client: 110022993388',
       'X-Bar: bar',
     ],
     'video': {
       'width': 640,        // The width of the video call container
       'height': 480,       // The height of the video call container
       'video_domain':  "<<video_domain>>",    // The video_domain obtained from the POST request to the API
     }
}
Cambiando el contenido del html del WebPhone
Observe el archivo phoneJstemplate.js dentro de demo/static/js/. Este archivo define una variable que va a renderizar/generar el contenido html del webphone. Esto es posible gracias a una librería de JavaScript llamada mustache.
Ud puede cambiar el template HTML a su gusto pero no puede modificar las variables de mustache, las cuales estan definidas de esta manera: {{{{webphone_keys_id}}}}
Obteniendo las credenciales SIP de login a traves de la API de OMniLeads
El usuario y contraseña ingresados para el Usuario Webphone Client son usados para obtener las credenciales SIP, con el fin de loguearse al sistema telefónico dentro de OMniLeads. OMniLeads provee una API para obtener estas credenciales, que luego serán usadas por el WebPhone. Para obtenerlas, tiene que hacer un request POST hacia esta URL: ‘https://OML_HOST/api/v1/webphone/credentials/’ usando un Esquema de Autenticación Básica.
Note
Las credenciales SIP que da la API son efimeras. Se vuelven obsoletas luego del tiempo establecido por la variable WEBPHONE_CLIENT_TTL. Las credenciales se refrescan cada vez que la API es consultada, y esto ocurre cada vez que un cliente hace una llamada desde el webphone. Se setea por default 20 minutos porque consideramos que una llamada en promedio dura eso, pero si en su negocio algunas llamadas duran mas, considere incrementar el valor de esta variable.
Este es un ejemplo de una request hacia la URL de la API usango Postman. Es solo para mostrar la respuesta de la API:
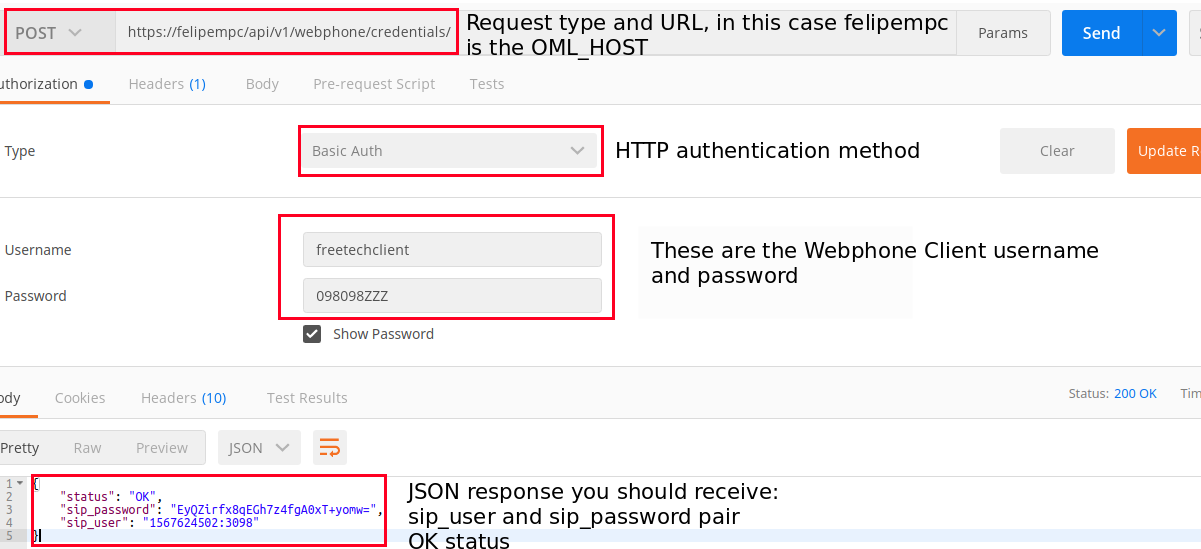
Puede observar un ejemplo del código en python para conectarse a la API y obtener las credenciales en este archivo: demo/views.py
Cambiando el diseño del webphone
El DOM para esta aplicación es el siguiente:
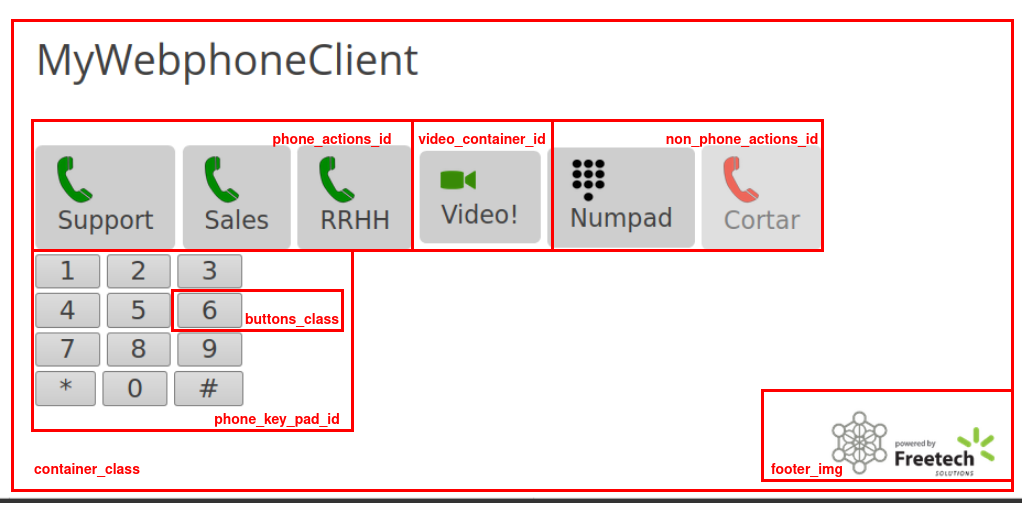
Con este DOM ud puede configurar los ID’s y clases que desee, y puede usarlos en su archivo .css para cambiar el diseño por default que trae el webphone.